.jpg)


HOLDS AND HOLD ENTRIES
Holds denote a racetrack pattern of flight designed to keep the aircraft relatively stationary over a navigation fix (usually a VOR, NDB, or a DME point on a VOR radial). Holds are fundamental to IFR training and provide an excellent means of developing instrument flying skills.
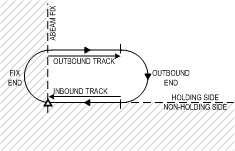
Standard Holding Pattern
The position of the hold is assigned by ATC or is in accordance with a published chart or plate. The goal is to enter the hold smoothly after crossing the fix, and then produce a series of racetrack patterns in which a one-minute leg is flown inbound along an assigned VOR radial or NDB track. The quicker you are at establishing a precise one-minute inbound track, the more highly regarded are your instrument skills. In calm winds, the manoeuvre is relatively straight forward (once you get the entry sorted out), but the trick is producing an accurate hold in windy or turbulent conditions. Unless otherwise advised, all turns in a hold are to the right. The depiction below is the Standard Holding Pattern and its component parts. An aircraft flying the above hold would be described as “holding inbound on the 270° track,” in the case of an NDB hold, or “inbound on the 090° Radial,” in the case of a VOR. The hold is “standard”—meaning that turns are to the right.
Hold Clearances
Hold clearances follow a prescribed format, including usually the routing to the hold fix, the side of the fix you are to hold on (e.g. west, south-west, etc.), the exact VOR radial, NDB track, or Airway, the altitude you are to maintain, and the time at which you can expect a further clearance (just in case your radio quits you won’t be caught in the hold). Here is an example:
|
Controller: |
|
“ABC, I have your hold clearance when you are ready to copy.” |
|
Pilot: |
|
“Go ahead with the hold clearance for ABC.”1 |
|
Controller: |
|
“ABC, you are cleared direct to the Whatcom VOR. Maintain 4000’. Hold southwest of the 230° Radial. Expect further clearance at 2150.” |
|
Pilot: |
|
“ABC is cleared direct to the Whatcom VOR. Maintain 4000’. Hold southwest on the 230° Radial. Expect Further at 2150.” |
|
Controller: |
|
“ABC, readback correct.” |
The hold manoeuvre is of course an IFR manoeuvre, and IFR pilots are legally required to readback a clearance. Just to minimize errors, clearances are normally written down.
Hold Entries
The prospect of flying a hold is really straightforward. You simply fly inbound on the assigned track on which the hold is defined, and, after the fix is crossed, turn outbound and fly the reciprocal heading. In calm winds, the procedure is relatively easy (in wind conditions, the process is a little more complicated, and this is discussed below). Where students do find holds challenging is with respect to the entry procedure. So, while flying a hold is generally easy once established, it is the hold entry where you will be tested.
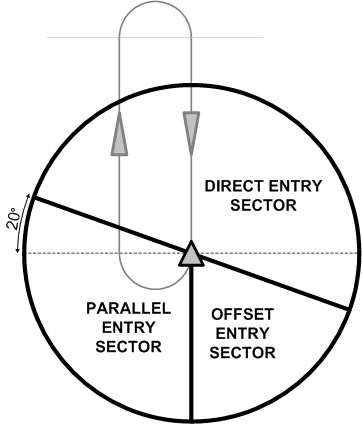
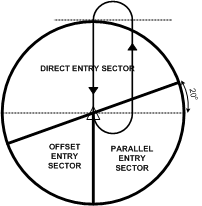
To understand the hold-entry procedures, you must first understand that the aircraft can approach the fix (direct track) from any direction, so the challenge rests with trying to figure out the initial turns that must be accomplished to end up tracking inbound on the assigned holding track (the inbound track). Essentially, there are three hold-entry patterns, which are derived from three sectors of origin as described above.2
The hold-entry patterns, incidentally, are mandatory and must be flown as prescribed in the AIM (RAC 10.5) and the Instrument Procedures Manual.3 Based on the sector from which you approach the assigned fix, the three entry procedures are defined as the parallel entry, offset entry, and direct entry. A simple technique for determining the hold-entry pattern to be flown (based on the sector of origin) will be described below, but first, let us examine the three entry patterns.
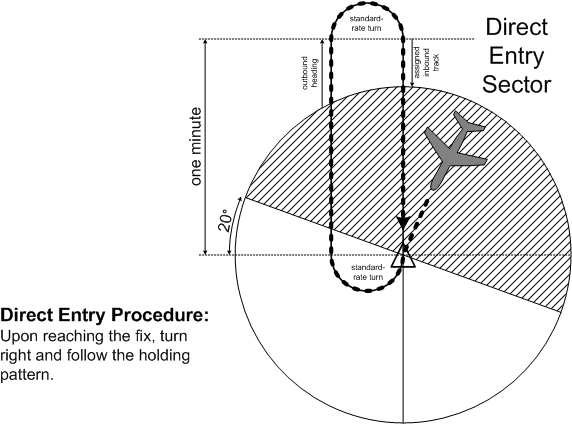
Direct Entry
Direct entries are just plain easy. Proceed directly to the assigned fix, and then, after crossing the fix, simply turn right (standard hold) to the outbound heading. After passing “abeam” the fix outbound on the outbound heading, start your timer and fly for one minute. Then, initiate a right turn to intercept the inbound track. In calm winds you will produce a one-minute track on the inbound leg. A depiction of the direct entry is provided below:
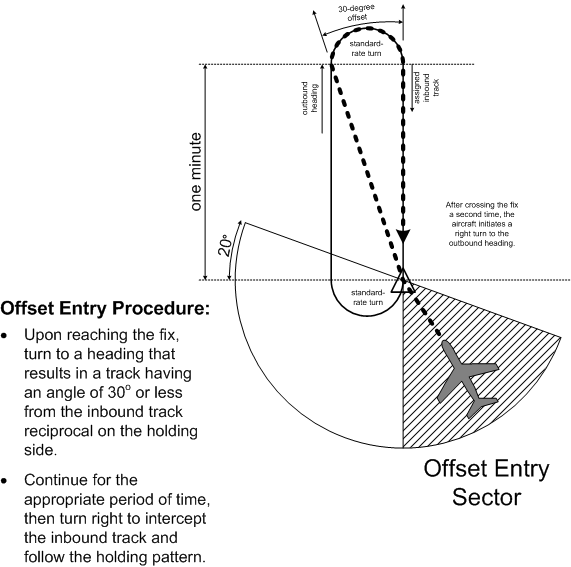
Offset Entry
After crossing the fix during an offset entry, turn to a heading that is 30° less than the outbound heading; fly this “offset” heading for one minute than turn right and intercept the inbound track. Here is the pattern for the offset entry:
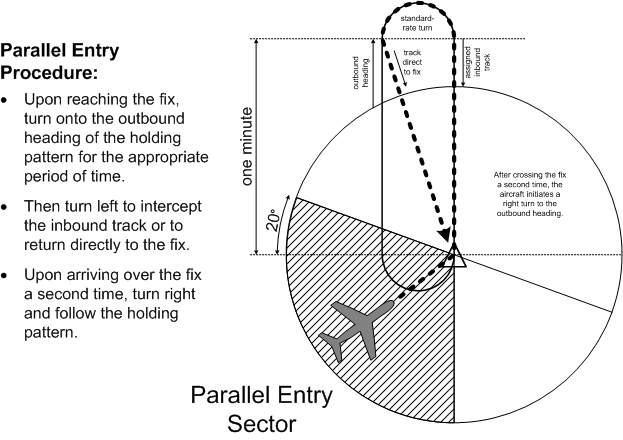
Parallel Entry
After crossing the fix during a parallel entry, simply turn to the outbound heading of the hold—maintain that heading for one minute, then turn in a direction opposite to the hold turns—that is, turn to the left (“parallel is opposite”). After the turn is flown for one minute, roll out so as to track directly to the fix and essentially fly a direct entry (turn right to the outbound heading after crossing the fix).
Hold Considerations
Remember that the name of the game is to nail the hold as quickly as possible—this includes both tracking and timing. Some things to remember:
The wind correction required on the inbound track should be doubled during the outbound track; in slower aircraft this correction sometimes appears unbelievable—nevertheless, trust the formula.
The point at starting the timing on the outbound leg must be the same every time—any error here will throw your timing out. Starting the timing for the inbound leg should be initiated when the inbound track is intercepted, or when the wings are levelled (in the event an intercept is required).
During the inbound turn, study the movements of the needles carefully. In the case of a VOR hold, note when the track bar begins to show signs of migrating. If you are behind in your turn, smoothly increase your bank to the maximum acceptable for instrument flying—30° of bank (be careful doing this as you increase the complexity of the turn (by adding the need for delicate pitch-up inputs, and you increase the risk of vertigo).
In the case of an NDB hold, remember that a properly flown hold in calm winds should produce a 30° deflection off your tail just before you initiate your inbound turn. As the inbound turn is made, watch the position of the ADF needle in reference to the inbound track on your heading indicator—your ability to visualize the ADF needle on the heading indicator in reference to the inbound track will help you modify your bank.
The POD Method of Hold Entry
The decision-making of a pilot can be taxed a great deal, especially during the holding procedures flown in conjunction with an IFR approach procedure. It is during this time that the IFR pilot must assess the weather governing his approach, the instructions provided by ATC, and the approach procedures to be used. With all this to consider, it makes sense that a holding assignment should not present any more decision-making effort than required—carrying out that assignment should be as simple as possible.
Flying a holding pattern is not difficult. Wind correction and timing adjustments are crucial, but there is lots of time (four minutes or longer per circuit), and it is expected that the pilot exercise “trial and error.” The tricky part is the entry. More specifically, the IFR pilot can be faced with having to record, read back a hold assignment, plus decide on the entry headings to be flown, within minutes of reaching a fix. These few minutes just prior to entering a hold are crucial and an IFR pilot must be trained to accomplish the tasks safely as quickly as possible. This is where the POD Method fits in.
The POD Method essentially “frees up” your decision-making. When a hold clearance is received, the first reaction is an attempt to “visualize” how the hold looks on the map. Using a mental map, we attempt to place our aircraft relative to the assigned fix, and then draw how the hold will look—“If I approach from this track, I will cross the fix and steer a heading of . . .” Too slow! Instead, using the POD Method, we use the heading indicator as an “entry aid.” As we approach the fix, the heading to the fix appears at the top of the heading indicator (assuming, that is, you are proceeding directly to the fix, which will always be the case with a hold clearance). We then visualize an inverted “T” centred on the instrument as indicated below:
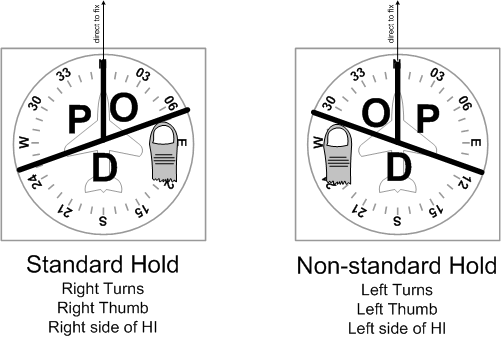
Note that the thumb rotates the lateral line 20° as indicated. Once the imaginary sectors are mapped on the heading indicator, the rest is easy. Simply visualize which sector the outbound track of the assigned hold lies. If the outbound track is in the “P” sector, the pilot performs a parallel entry procedure; if the outbound track is in the “O” sector, an offset entry procedure is flown; finally, if the outbound track is in the “D” sector, the pilot flies a direct entry procedure. Simple, don’t you think?
Practise the POD method with a piece of paper. The more times you practise it, the better you will be in the cockpit:
- Draw a circle and assign yourself a random heading to a fix.
- Map out the POD, including the 20° “slide”; each sector border should have a heading.
- Write out an imaginary hold clearance with random headings.
- Determine your outbound track, place it on the map, and determine the entry procedure.
- Confirm your choice by drawing your fix and hold and the path of the aircraft.
Remember, the idea is to determine the hold entry as quickly and as accurately as possible. When practising in the air, incorporate the POD method as standard procedure:
- ATC hold clearance.
- Write and readback.
- Tune, Identify, Select and Test the navigation aid (if applicable).
- Turn direct to fix and/or determine heading direct to fix.
- Map out the POD and place the outbound track to determine entry procedure.
- Crossing fix:
|
Time |
Start your timer to time the outbound leg of the hold. |
|
Turn |
Turn to the entry heading for the hold. In the case of a direct and parallel entry, you simply make a turn to the outbound heading. In the case of offset entry, you turn to the outbound heading less 30°. |
|
Throttle |
Reduce your power to the hold power setting.4 |
|
Talk |
Report entering the hold—“ABC entering the hold.” |
References
1 Conversely, if the pilot is busy with flying tasks, the response “Standby” is appropriate, with the pilot’s later response “. . go ahead with the hold clearance.”
2 This diagram below shows a hold pattern with left turns—referred to as a “non-standard” hold.
3 The Instrument Procedures Manual is the main textbook used by Instrument Rating students.
4 In the Cherokee, the power setting should be that which is necessary to maintain 90 MPH.
G